Copying items back to the Clipboard
In order to paste an item held in ClipMagic into an application you first need to copy that item back to the clipboard. Do this by selecting the item and using Edit/Copy, or right click on the item to reveal the pop up menu and then select 'Copy'. It is also possible to make the double click action copy the item to the clipboard. By default, double click opens the properties dialog. You can set the double click action in options.
If you have MagicPaste enabled the item will not only be copied to the clipboard, but also automatically pasted into the application you are working in.
You can also retrieve items from ClipMagic without opening ClipMagic. Whatever application you are in ALT-DOWN will copy the next clip in the current ClipMagic category into the clipboard, and ALT-UP will retrieve the previous clip in the list. With MagicPaste switched on the clip is also pasted into the active window. This is a great way to past a series of items. Enable MagicPaste, select the first item in ClipMagic, go to the application you want to paste into and just keep pressing ALT-DOWN - each item is pasted one after the other.
Using the system tray clip menu
Recent clips are listed in a menu that appears when you right click on the ClipMagic icon in the system tray. Right click the icon and select 'Copy Clip'. A menu then appears with the names of the most recent clips. Selecting a clip from this menu will cause it to be placed on the clipboard so that you can insert it into the application you are working on using CTRL-V or Edit/Paste, or if you have MagicPaste enabled, it will be inserted into the current application for you - you won't have to paste it in with CTRL-V or Edit/Paste yourself. By default 10 clips are shown in the system tray clip menu. You can alter this number in options.
It is possible to assign a keyboard shortcut or hot key to a clip so that you only have to press those keys to have that item placed back on the clipboard. For text clips you can also make a hot key type the text out in the current application. You can do this in Item Properties. With the appropriate clip selected, select the Tools menu and then "Item Properties". The properties dialog will appear. Check the box next to 'Assign this Hot Key' and choose the key combination you want to use from the drop down boxes. If you want to have ClipMagic type the clip out, as well as place it in the clipboard when you press these keys, check 'Send text into active application using keyboard events'.
For example, if you assign CTRL-SHIFT-D to a clip, but don't check the 'Send text ..' option, you will now be able to copy the item to the clipboard by pressing CTRL-SHIFT-D wherever you are. Then press CTRL-V to paste it into the current application. With the 'Send text ..' option ticked you won't have to do the CTRL-V, but the text will be typed out rather than pasted, so it won't keep it's formatting information.
System hot keys ALT_UP and ALT_DOWN can also be used to quickly copy the previous/next clips in the category. See System Hotkeys. With MagicPaste switched on these keys are very powerful as they will also perform the paste.
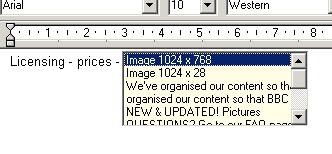
PastePicker is a box that displays a list of the most recent clips in ClipMagic from which you can select to paste into the active application. You assign PastePicker to your favourite pasting hotkey, e.g. CTRL-V or SHIFT-INSERT, or any other hotkey you would prefer. Now when you are in an application and you press CTRL-V (or your preferred hotkey) the PastePicker box appears and you can just press Enter to paste the most recent clip, or scroll down the list to choose a different clip.
The picture above shows PastePicker being used in WordPad.
To see a preview of the clip, right click and select 'Item Preview'. This is especially useful if you have a list of images which may all have similar or identical names (but don't forget you can rename clips to something more useful than the default!).
If a clip has an Internet link associated with it you can launch that link in your browser so that you can revisit the source page of the clip. This can be done in any of the following ways :
- Select "Launch URL" from the Tools menu. - Press CTRL-L - Click on the Launch URL button in the main toolbar. - Click on the Launch URL button on the web toolbar. - Click on the link in the detail pane, just like clicking on a link in a web page.
You can also click on URLs that appear in the actual text of a clip.
Depending on how you have set up your Internet options, the URL will be loaded in either your main web browser, or the internal ClipMagic web browser. You can also have clip URLs loaded automatically if you enable Launch URL on Select.
Print clips by selecting File/Print or File/Print Selected Clips.
You can save text clips to a RTF (Rich Text Format) file or a plain text file, and image clips to a BMP (Bitmap) file. With the appropriate clip selected, press 'File/Save As', or click on the Save As button on the main toolbar. Choose where you want to save the file and enter an appropriate name and click 'Save'.
|
