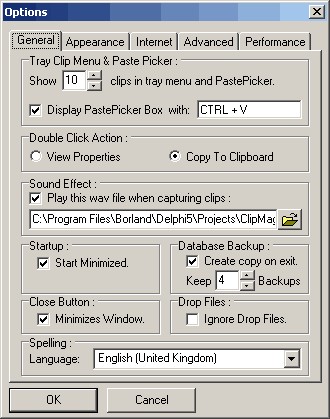
This dialog allows you to set a number of options for ClipMagic :
Tray Clip Menu & Paste Picker You can specify how many recent clips to show in the system tray 'Copy Clip' menu and PastePicker box. See Tray Menu for more details about this facility. Also see PastePicker. If you wish to use PastePicker check the box and select the hotkey you wish to trigger it. The most effective hotkey would be the one you usually use to paste with such as CTRL-V or Shift-Insert.
Double Click Action This allows you to determine what should happen when an item in the details list is double clicked. The item can either be copied back to the clipboard for pasting into another application, or the item's properties window can be displayed.
Sound Effect Check the box to enable a sound effect to be played when an item is captured. Press the browse button to the side of the text box to find a .wav file.
Startup Check the box if you want ClipMagic to be started minimized (hidden).
Database Backup Check this to make ClipMagic create a backup of the database each time it closes down. Enter the number of backups that ClipMagic should keep. For example, if set to 3 ClipMagic will keep the last 3 backups. Backups are stored in a Backups directory under the Data Directory (Look in Advanced options to see what your data directory is) in their own folder named with the current date and time in the format yyyymmddhhmmss.
Close Button This allows you to determine the behaviour of the main window's title bar close button. This would normally close the application altogether, but the default option for ClipMagic is to minimize it to the system tray. If you'd prefer it to exit the application, uncheck this box.
Drop Files Drop files are files that are copied to the clipboard - like when you copy files in Windows Explorer. ClipMagic will keep track of these types of clips as well as as text and image clips. If you wish to ignore these types of clips check this box.
Language Select the language you wish to use for spell checking. By default English is selected.
Fonts Here you can set the default font for the comments window and for ordinary text clips. Rich text clips already contain font information, but normal text clips, such as text copied from Notepad, do not have any font details, so will be displayed in the font chosen here.
URL Display Use this to enable/disable formatting of URLs in the Clip List and set the URL color.
Category Tree Check whether categories should automatically be expanded/collapsed when you click on them (as opposed to clicking on the plus sign to expand). Also set whether you want the category tree to be fully expanded on startup.
Image Clips Select how to display Image Clips. Scroll means the image is displayed actual size with scroll bars. Stretch sizes the image to fit the panel disregarding the original aspect ratio. Scale scales the image, maintaining a 1:1 aspect ratio, to fit centrally in the panel.
Splash Screen Here you can disable the splash screen on startup. The splash screen does serve a useful purpose in providing progress indication as the database is initialised. Startup will take longer as the database grows so it is useful to see the splash screen while the application is initialising so that you know something is happening.
Launching URLs This allows you to specify which browser to use when you launch Internet addresses. you can select to use your default internet browser or the internal ClipMagic web browser.
Non IE/Netscape/Opera Web Browser ClipMagic works automatically with Internet Explorer, all Internet Explorer based browsers (such as NetCaptor, MyIE2 and Research-Desk), Netscape and Opera by first locating the Source URL in the HTML clipboard format and then using DDE if no URL is found.
However, if you are using an alternative browser you can enter the title of the web browser here. ClipMagic will then attempt to locate the URL when a clip is taken from that browser. Enter the title of the browser as it appears in the browser's title bar. The detection technique is generic and works by scanning the browser application's windows for a piece of text that looks like a URL. There are no guarantees that this will always work.
Email Address Enter your email address here so that you can send clips by email.
SMTP Server Enter the address of the server you use to send email. This is needed for sending clips by email.
Delete Web History Deletes the history of visited internet URLs that appears in the address bar of the internal web browser.
Delete Email History Deletes the history of email addresses that you have sent clips to. The history list appears in the email dialog's combo box.
Size Limits You may want to avoid clips over a certain size being stored in ClipMagic. To do this check the appropriate box(es) and specify a byte size for the type of clip.
Auto Purge Over time, the default category in ClipMagic can become very cluttered. Likewise you may forget to permanently delete items from the Trash folder. This option allows you to switch on auto purge for these categories. Specify a number of days, and each time ClipMagic starts, items older than that number of days in these folders will be deleted.
Data Location By default data is stored in the same directory as ClipMagic. However, if you wish to use a different directory to store the data, you can select it here. If the new directory that you select does not already contain ClipMagic data, the current data will be copied into it. ClipMagic will not use the new location until it is restarted.
Save Action Here you can define when ClipMagic should save it's data to disk. By default it works in memory and only saves it's indexes and data to disk when it is closed down. At this point it also tidies up the data. Although ClipMagic has some automatic recovery features built in, this method still means there is a chance of data loss should your system crash for some reason. Therefore, you have the option of telling ClipMagic to save and tidy it's data each time a new clip is retrieved. This increases reliability but has a slight impact on performance.
Memory Usage When ClipMagic is in operation it constantly monitors it's memory usage. You have the option of specifying the balance between depending mostly on random access memory and depending mostly on disk cacheing. On the highest setting, which is also the default, ClipMagic uses a disk cache for handling data. This should mean that ClipMagic uses less system memory, leaving more for other applications, than if you select the lowest setting of 'Mostly RAM'. In theory using Mostly RAM should make ClipMagic run faster than if using the disk cache more, but could also influence system performance too. You therefore have the option of defining the balance between the two. Generally the default option should be fine in all cases, so if in doubt leave it set that way. |